Ensuring your 7 pin trailer wiring is correctly installed isn't just a technical task—it's a critical safety requirement. A flawless connection guarantees that your trailer's indicators, brake lights, and sidelights operate perfectly, keeping you safe, legal, and clearly visible on UK roads. The standard system, known as the 12N plug, is the vital link between your vehicle and your trailer.
At MTL Smart Solutions, we build our reputation on the integrity of our connections. Whether we're designing and commissioning a robust network infrastructure in London with a multi-building fibre backbone or executing a sophisticated smart home installation in Spain, every project begins with an unwavering commitment to a perfect foundation. This same professional rigour is essential for reliable trailer wiring.
Cracking the Code of the UK 7 Pin Trailer Connection
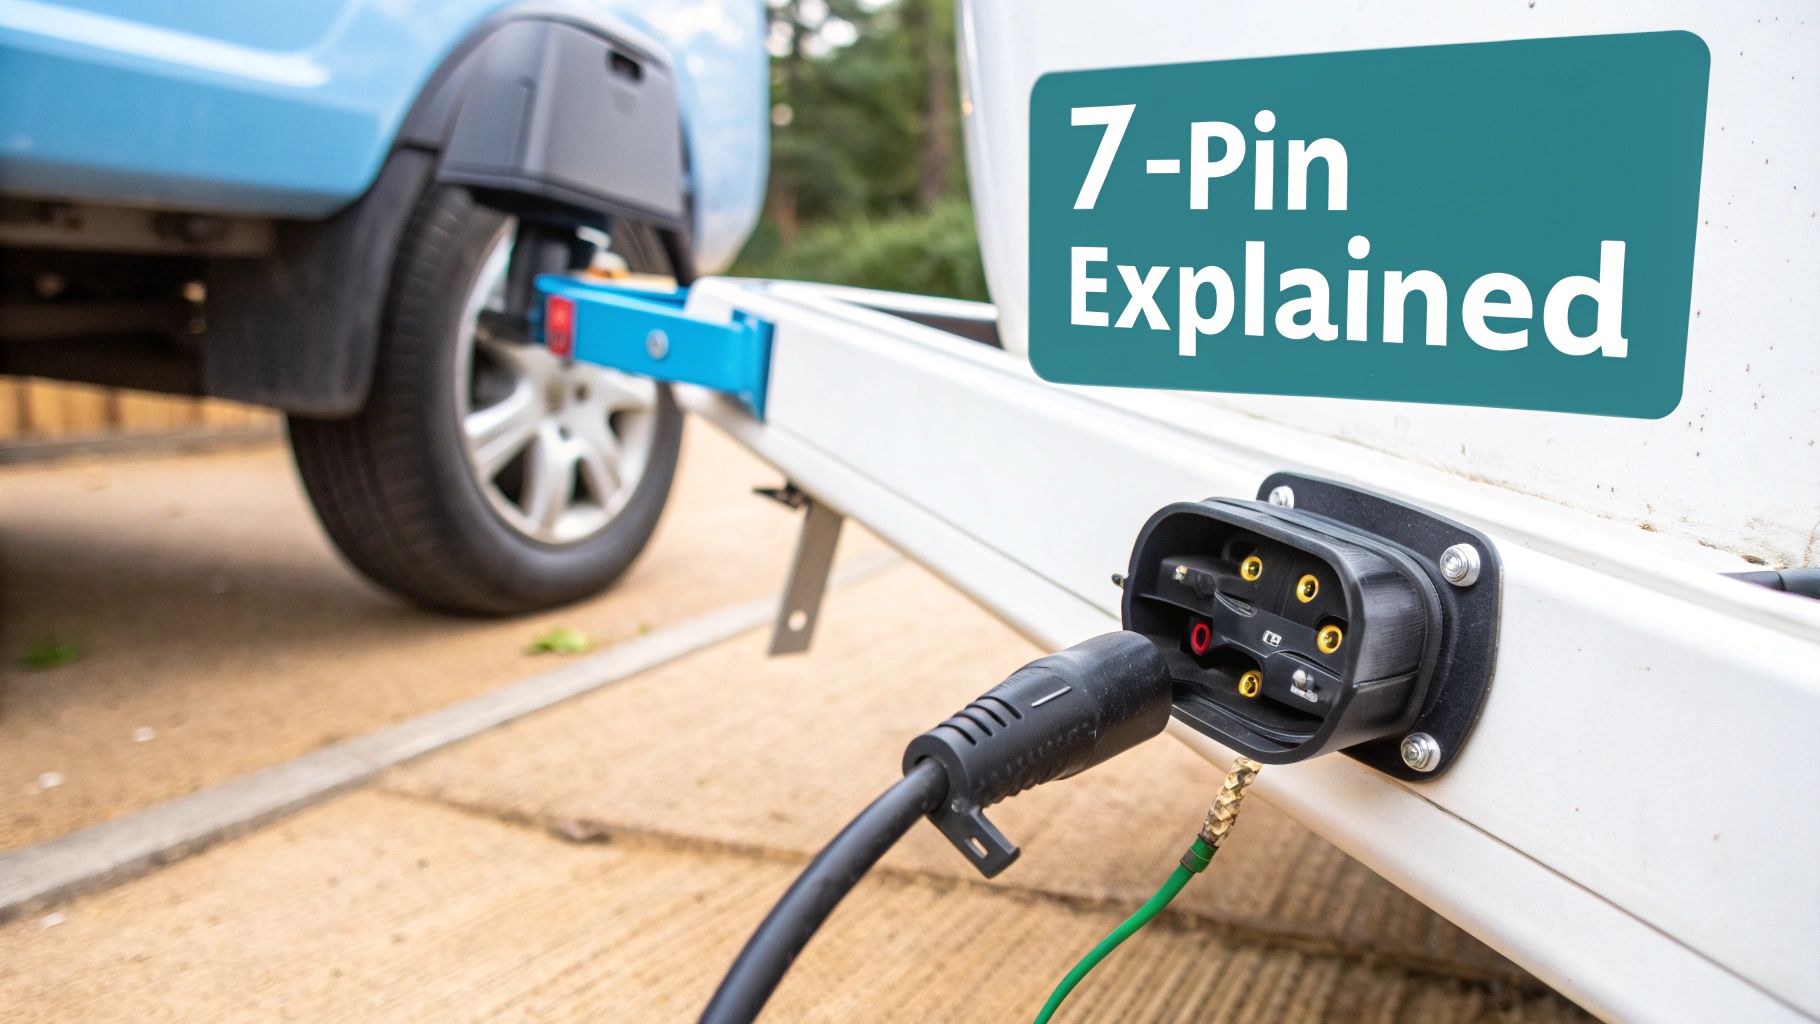
Before you begin, it’s vital to understand that the 7-pin system is the bedrock of safe towing in the UK. This isn't just about making lights flash; it's about road safety and legal compliance. It forms the central nervous system for your entire towing rig, and every single connection performs a crucial role.
This focus on core fundamentals is central to our work at MTL Smart Solutions. Whether it’s configuring enterprise-grade PoE switches for a CCTV installation in Estepona or integrating complex AV systems in a high-end UK residence, a flawless core connection is non-negotiable. That same meticulous attention to detail is precisely what’s needed here.
Why Every Single Pin Counts
Each pin inside the 7-pin plug has a specific, designated function. It is a brilliantly simple, standardised system that ensures any compliant trailer can safely connect to any compliant vehicle. Its reliability, however, hinges entirely on correct installation.
Getting this foundation right is non-negotiable. Official roadside checks reveal that failures in trailer lighting and wiring are a significant issue, accounting for a staggering 29% of problems leading to prohibitions. This data powerfully underscores just how critical correct 7-pin trailer wiring is for road safety.
For those interested in technical details, understanding this system is analogous to learning the pinouts of professional audio or data connectors. If you’re curious about how other connectors work, see our guide on the simpler 3-pins connector.
From our experience on complex smart home installations in Spain to demanding UK commercial projects, we know that a single poor connection can compromise an entire system. If you want peace of mind knowing your setup is installed with professional precision, contact MTL Smart Solutions to book a consultation.
UK 7 Pin (12N) Wiring Colour Code and Function
To simplify the process, the 12N system uses a standard colour code. Adhering to this is the key to a successful installation and removes all guesswork.
| Pin Number | Wire Colour | Function |
|---|---|---|
| 1 | Yellow | Left Indicator (L/H) |
| 2 | Blue | Rear Fog Lights |
| 3 | White | Earth Return |
| 4 | Green | Right Indicator (R/H) |
| 5 | Brown | Right Tail / Side Light (R/H) |
| 6 | Red | Brake Lights |
| 7 | Black | Left Tail / Side Light (L/H) |
Keep this chart handy while you work—it is your wiring bible. Double-checking each connection against this standard will prevent a world of headaches later.
Assembling Your Toolkit and Prioritising Safety
Before touching a single wire, preparation is key. A methodical start is the difference between a successful project and a frustrating afternoon. At MTL Smart Solutions, it doesn't matter if we're installing a sophisticated Hikvision or Ubiquiti CCTV system in a luxury Estepona villa or delivering a Wi-Fi system design in London—we always begin by arranging our tools and performing rigorous safety checks. Let's apply that same professional mindset.
Having the right equipment not only streamlines the task but also guarantees a robust, long-lasting connection. You don't need a complete workshop, just a few quality tools to achieve a professional result.
The Essential Tools for the Job
Let's get your toolkit in order. Ensure you have these items readily available:
- Wire Strippers: Avoid using a knife. A dedicated pair of wire strippers provides a clean cut every time, removing insulation without damaging the delicate copper conductors within.
- Wire Crimpers: This is essential for a rock-solid connection. A quality crimp creates a secure mechanical bond that won't loosen with road vibrations.
- A Reliable Multimeter: This is your best friend for any electrical task. It allows you to test connections, verify continuity, and confidently diagnose any faults in the system. It is absolutely non-negotiable for a professional job.
- Basic Hand Tools: A selection of screwdrivers and a small set of pliers are necessary for opening the plug housing and manipulating the internal components.
Your Safety-First Approach
Vehicle electrics demand respect. The very first action, before anything else, is to disconnect the vehicle's negative battery terminal. This simple step prevents short circuits, which could damage your vehicle's sensitive electronics or cause injury.
Adhering to proper safety protocols isn't just about compliance; it's the hallmark of a quality installation. It’s a non-negotiable for our engineers, whether they’re working on a smart home installation in Spain or a complex network infrastructure project in the UK and Costa del Sol, because it protects them and our client's property.
For more insights into best practices, explore our articles on UK electrical safety, which are filled with valuable tips for any wiring project. Always prioritise safety—it is the only way to ensure a successful outcome.
Wiring Your 7 Pin Plug with Professional Precision
With your tools organised and safety checks completed, it's time to begin the wiring. This is where care and attention to detail ensure your 7 pin trailer wiring is robust, safe, and ready for any journey.
First, prepare your multi-core cable. Carefully strip back approximately 25mm (one inch) of the tough outer plastic sheath to reveal the smaller, colour-coded wires inside. The key is to be gentle; nicking the insulation on these inner wires can lead to a short circuit down the line.
This infographic breaks down these crucial preparatory stages. A meticulous start makes the subsequent steps much smoother.
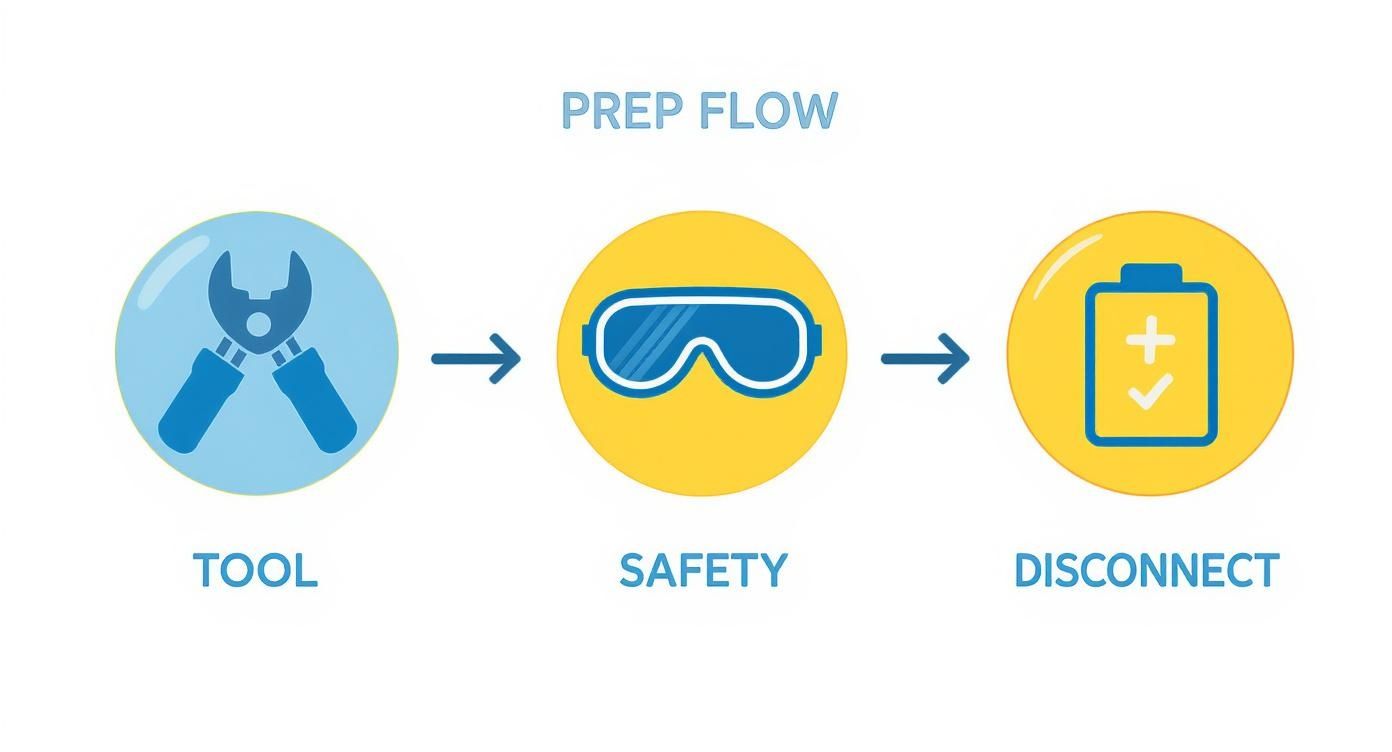
Consider this the groundwork. In any electrical project, excellent preparation is half the battle.
Achieving a Rock-Solid Connection
Next, address the individual wires. You'll need to strip a small amount of insulation from the end of each one—around 5-6mm is ideal. Once the copper is exposed, twist the strands tightly with your fingers. This prevents them from fraying and ensures a clean, secure entry into the plug's terminals.
Expert Tip: A secure connection is paramount. Whether it's a screw-down or a crimped terminal, ensure it is tight. A loose wire will inevitably work its way free, usually at the most inconvenient moment.
The standards for 7 pin trailer wiring have evolved, with modern safety regulations being far more stringent. All new connectors are manufactured to specific standards to ensure they are not just compatible, but completely road-safe.
The Final Touches That Define Quality
With all seven wires firmly seated in their correct pins, there's one last crucial step: the cable clamp. This small component is vital. It grips the outer sheath of the main cable, absorbing any strain and preventing pulling or vibration from compromising the delicate connections you have just made. Do not skip this step.
As you tackle more complex projects, mastering secure connections is a skill that will serve you well. You can find more professional tips and standards in our guides on electrical wiring.
Before reassembling the plug, double-check that you have all the necessary components. The right equipment makes any job easier, so it may be worth exploring specialized hitch and tow products to ensure you're properly equipped. Once it's all back together, you will have a trailer plug that’s built to last.
Don't Skip The Final Check: Testing Your Work
With the plug wired, the final and most important phase is testing. At MTL Smart Solutions, we never sign off on an installation until it has been rigorously tested and proven to work flawlessly—whether it's a Wi-Fi system design in London or a complete CCTV installation in Estepona. Our commitment to delivering the same high standards of UK engineering and professionalism to our Spanish clients in Sotogrande, Estepona, and Manilva demands it.
To verify your 7-pin trailer wiring, use a multimeter or, ideally, a purpose-built trailer light tester. You will need a second person for this. Ask them to sit in the driver's seat and cycle through all functions: left indicator, right indicator, brake lights, and the fog light. Observe the tester or your trailer lights—each should illuminate instantly and brightly.
What to Do When Things Go Wrong
If a light fails to operate or your indicators flash erratically, don't panic. This is where methodical troubleshooting—the same logic we apply to smart home projects across the UK and the Costa del Sol—is key. Remain calm and work through the checklist.
- Earth is Everything: In our experience, 9 times out of 10, the issue is a poor earth connection. Check the white wire on pin 3. Is it making a clean, tight connection to the vehicle's chassis? Any rust or paint will disrupt the circuit.
- Fuses First: Before dismantling your wiring, check the vehicle's fuse box. A blown fuse is a common and easily rectified problem that could save you a significant headache.
- Double-Check Your Connections: If the fuses are intact, open the plug again. Give each wire a gentle but firm tug. A screw that isn't fully tightened or a poor crimp can easily work itself loose.
This logical fault-finding process is how we approach any technical challenge. It’s no different from ensuring perfect signal flow when we install ceiling speakers. For another perspective on testing vehicle electronics, see a detailed guide on how to test parking sensors.
Take your time. Rushing leads to missed clues and frustration. A calm, step-by-step approach will identify the fault much faster than frantic guesswork.
If you’ve completed all the steps and are still experiencing issues, our experts are here to help. MTL Smart Solutions brings top-tier UK engineering standards to clients in both Britain and Spain, resolving everything from simple wiring faults to complex network infrastructure challenges. Contact us today for a tailored quote or to request a site visit.
Maintaining Your Trailer Electrics for Long-Term Reliability
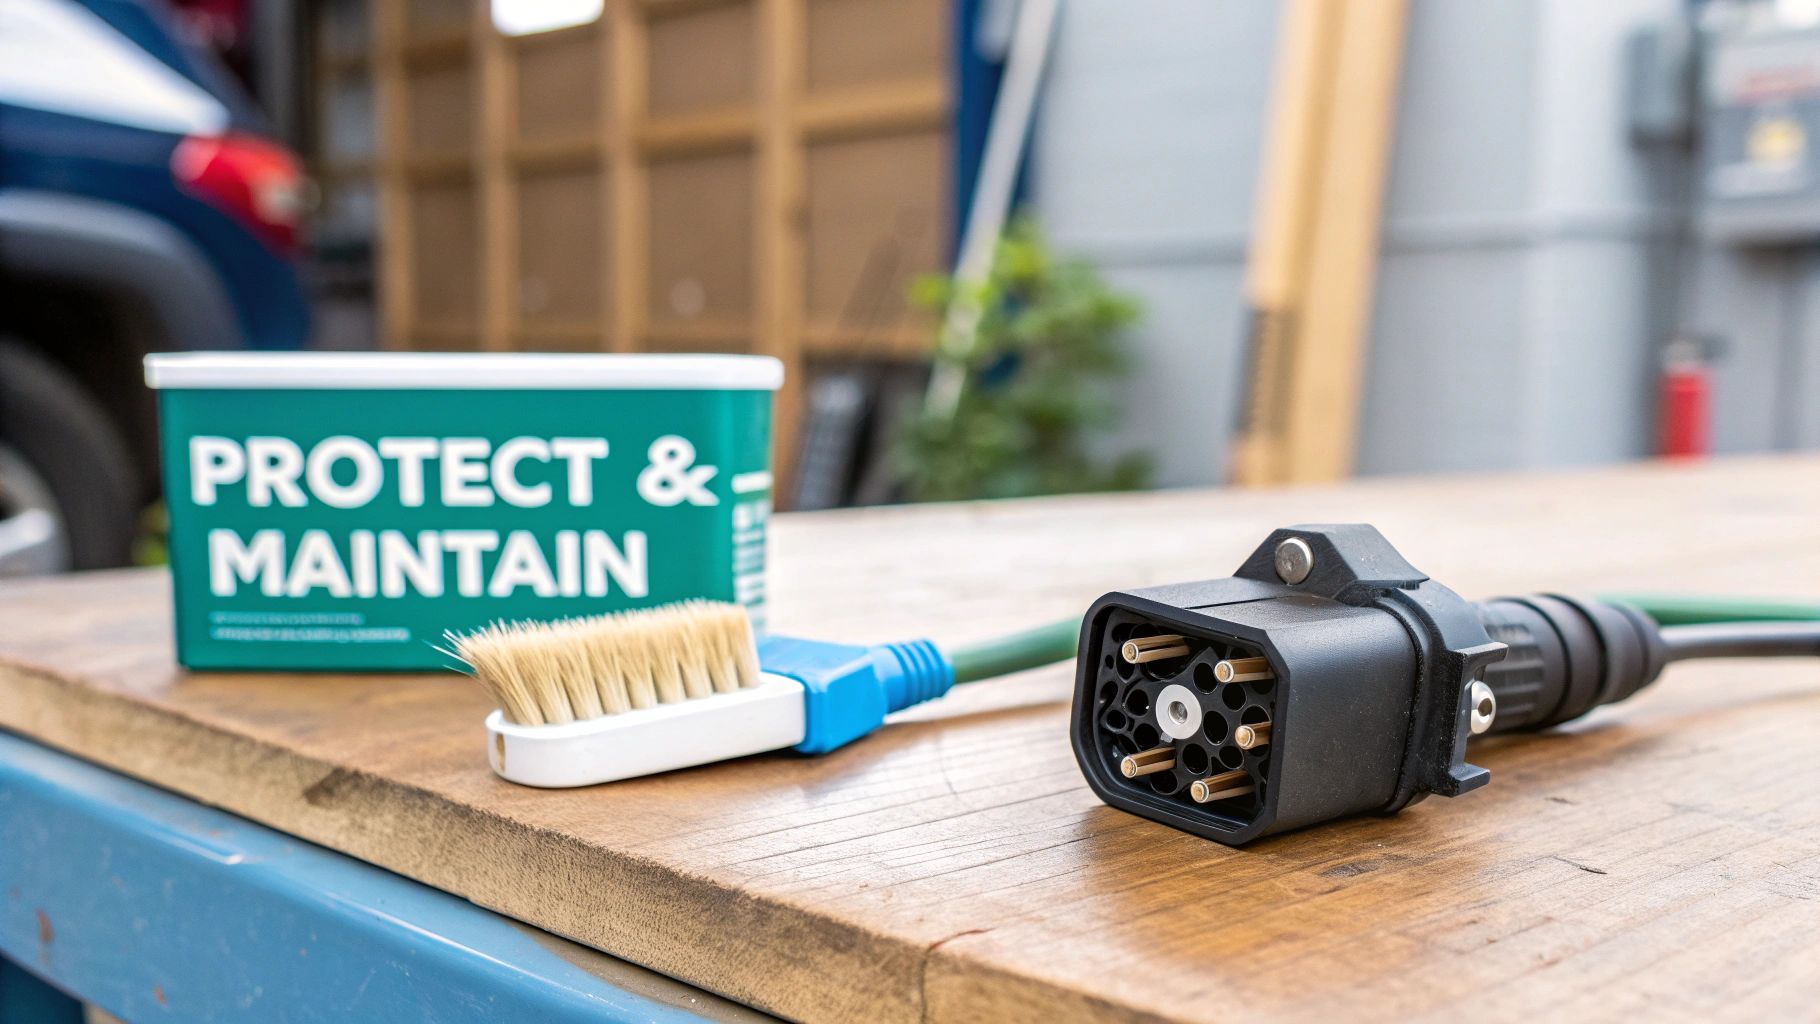
Correctly wiring your trailer is a significant achievement, but it's not the end of the journey. To ensure your 7 pin trailer wiring functions flawlessly for years, regular maintenance is essential. This is the same philosophy of innovation and reliability we apply to all our managed network services and installations, from a multi-building fibre upgrade in London to a luxury villa's Wi-Fi and CCTV installation in Estepona.
Think of it as a periodic health check. Regularly inspect your plug for signs of corrosion—a green or white powder on the pins. This is the enemy of a solid electrical connection. If you spot any, a gentle clean with a wire brush will restore a perfect contact surface.
Shielding Your Connections from the Elements
From the damp UK motorways to the salt-laden sea air of the Costa del Sol, the weather constantly threatens your electrics. Your best defence is effective weatherproofing.
A small application of dielectric grease on the pins works wonders. It forms an excellent barrier against moisture without impeding the electrical current. This simple, inexpensive measure can dramatically extend the life of your entire setup.
This is not merely about being thorough; it's a critical safety issue. Faulty electrics are a serious hazard. In fact, UK government data from 2017/18 revealed that electrical faults were the cause of half of the 38,321 accidental property fires, a figure that includes towing-related incidents. You can learn more about how regulations aim to improve electrical safety.
Finally, ensure your cables are properly secured and not dangling or dragging. A few strategically placed cable ties or clips will prevent wires from being abraded or pulled, protecting the meticulous connections you've just made.
If you demand systems built with this level of attention to detail and professional expertise, get in touch with MTL Smart Solutions to book a consultation.
Common 7-Pin Trailer Wiring Questions Answered
With the practical steps covered, let's address some common questions that often arise. Having clear answers will provide the confidence needed to complete the job correctly.
What is the Difference Between 7-Pin and 13-Pin Plugs?
This is an excellent question. The 7-pin (12N) plug is the classic UK standard, handling all essential lighting functions required to be legal and safe—indicators, brake lights, and sidelights. It is simple and effective.
The 13-pin plug is the modern, all-in-one solution. It incorporates all the functions of the 7-pin plug but adds extra circuits for features such as powering a caravan refrigerator or charging an onboard battery. If your vehicle and trailer have mismatched plugs, adapters are widely available and simple to use.
Why Have My Trailer Lights Stopped Working Entirely?
Nine times out of ten, the culprit is a single issue: a poor earth connection. The white wire on pin 3 requires a rock-solid, clean connection to the bare metal of the chassis. If this connection is compromised, no other function will work correctly.
If the earth connection is sound, the next step is to check for a blown fuse in your vehicle. If the fuses are intact, reopen the plug and double-check for a loose wire inside. The fault almost always lies with one of these three possibilities.
Pro Tip: Always adhere to the official colour codes. While you could create your own system, you would be creating a significant challenge for the next person to work on the trailer (which could be you in the future). Standardisation is essential for safety and reliable maintenance.
Do you have more technical questions? You will find a wealth of helpful information on our Frequently Asked Questions page. As network infrastructure experts in the UK and Costa del Sol, we are always ready to provide clear, actionable advice.